- Open command prompt.
- change to the directory in which u want to make folder.
- type
- mkdir .\con\\
- Or
- Md .\con\\
- You can choose folder name from the name given below
- CON
- LPT1
- LPT2
- LPT3
- LPT4
- LPT5
- LPT6
- LPT7
- LPT8
- LPT9
- AUX
- -----------------------
- Logic behind this is : IN Windows above names are researved words and you cann't create folder or file
- with above name. Once you will create the folder nobody will be able to delete it in normal way.
- have tested it with XP 2000 and 2003. Windows 98 is currently not available to me for testing.
- If you can test it on Windows 98 then please do it and let me know the result. I expect it to work.
- to create that folder u have typed
- mkdir .\con\\
- Or
- Md .\con\\
- right......!
- now to remove that folder u have to type
- rd .\con\\
- ok....!
Creating An Undeleateable Folder
ReadyBoost Speed Up Windows Vista
- One very cool feature of Windows Vista – especially for machines not natively equipped with the kind of horsepower to fully enjoy the rich visuals of Windows Presentation Foundation (Avalon) applications is ReadyBoost. ReadyBoost enables you to plug a USB key into your machine and have Windows Vista use it as memory. I hadn’t actually used this myself, but had heard of it long ago. When a reader emailed me asking if this was an urban legend, I decided to check it out for myself and was very impressed with how easy and seamless the process is.
- Installing/Configuring the USB Key as Memory
- First I took a standard USB 2.0 key (I’ll list the prerequisites shortly) and plugged it into my machine. I’m running Windows Vista Beta 2, Build 5346, but I’m told that this works with the latest CTP made available to beta and TAP members as well as MSDN Subscribers. Upon plugging the USB key into my computer, I was greeted with the standard "AutoPlay" dialog box asking how I wanted to the operating system to treat the USB key. However, with ReadyBoost I get the additional option (circled below in the screen capture) of using the key to "speed up my system".
- Once I click the "Speed up my system" option, the Properties dialog box for the device is displayed where I can specify to start/stop ReadyBoost usage of the device and how much space I want used as a memory cache. (Actually, according to one of the Product Specialists here, this space is used more as a flash-based page file than true RAM, but the impact is that the more space you choose here, the more benefit you’ll get in terms of overall system performance.)
- (In order to return to this dialog box, open the Computer window, right-click the drive (F: in this case) and select Properties. From there, click the Memory tab (as shown in the previous screen capture and adjust the settings as needed).
- For the inquisitive, opening the drive in an Explorer window reveals that ReadyBoost has created a cache file of the specified size.
Add Tags To Your Photos on Orkut

This very cool new orkut feature will allow you to add tags to your photos. Friends can tag each other friends in group photos. Each profile has a new 'photos of me' section which will inform them if any of their friends have tagged them.
» How to add tags to your orkut photos
» I don't want my friends to tag me
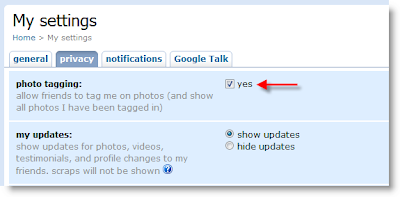
- In this case, navigate to your privacy settings page

- In the first section, you'll find photo tagging setting.
- Un-check the box and update your profile.
- That's all.
How to Convert Your Favourite Blog Posts or Webpages into PDF or Images Online for Free
How do you remember your favourite blog post and / or web page.Either
bookmark or save the page,right? Now you can make it easy with a cool
website that converts URL's into pdf documents or images.Just paste the
url and select options.Within minutes ,you receive a link to download
in selected format.If you enter email (optional)address, you can
receive the download notification in your inbox too.
Goto freepdfconvert then enter URL Fill-up the options and click convert.
Additionally you can
-Convert MS Office,Images,Vector Graphic formats to PDF
_Convert PDf to word,excel,rtf formats
I
have tried out this cool service and successfully converted most useful
blog posts into PDF documents and images for further read when i am
offline.Do try and don't forget to comment on how it worked for you.
NOTE:-
For a Non-member this service is limited to 15 conversions per month
and intervals between submits should be atleast 30 mins...


