Sometimes you like some song and you want to hear it again, but you can't as you don't have that song. More worse thing can be that you can't even download it from the internet since you don't know the artist name nor the album name not even the title.
Now to solve this problem there is a cool piece of software named Tunatic that can hear a song and then identify the artist’s name and the song’s title. It’s available for both Windows and Mac OS X, and best of all, it’s free! Tunatic is the very first song search engine based on sound for your computer. All you need is a microphone and Internet access.
How does this work? When you click Tunatic's ‘search’ button, Tunatic transmits the song's features to the Tunatic server. The server searches its database and returns the matching song.
You can get more tips here like if you don't have microphone most PC sound cards allow you to select "What You Hear" (also named "Stereo Mix" or "Mixed Output") as input. To get there, right-click Tunatic's window, select "preferences", then click the "Configure..." button.
Website || Download it here
How to Identify Song by its Music?
Recover Deleted Photo Using Thumbs.db File
Sometimes due to our carelessness, we might accidentally delete some important digital photos. That might be the only copy of your important and memorable photos such as your wedding or graduation photos, travel snapshots, naked photos of your boyfriend when he was three, etc. Is there any way to recover your digital photos or are there any recovery tools to rectify your carelessness and get back the deleted photos? There are various ways to recover your invaluable possessions. Amongst them, one of the recovery methods is via Thumbs.db file.
Thumbs.db file is a database file that stores a cache for Windows Explorer’s thumbnail view. Windows keeps thumbnails of miniature graphics files in the Thumbs.db file in each directory that contains pictures or photo in various formats such as PDF, GIF, JPEG, BMP, TIF and HTM. The thumbnail cache improves significantly the speed of displaying thumbnails as new thumbnails need not be created every time the folder is viewed; most importantly, this file can help you to recover your deleted photos.
Thumbs.db is a hidden file and you can only see it when you have enabled “show hidden files and folders”. Go to Windows Explorer, Tools -> Folder Options > View Tab and enable “Show hidden files and folders”. From the View Tab, you also need to make sure that you have turned on the thumbnail caching. Be sure that you don’t check the box next to “Do not cache thumbnails”. By doing the aforesaid, when you use Windows Explorer to view the contents of a folder in “Thumbnail” or “Filmstrip”, Thumbs.db file will be generated and you can use this Thumbs.db file to recover your deleted photos. This is because deleting images from a folder does not remove or erase the thumbnail from the Thumbs.db database cache.
To recover your deleted photos from Thumbs.db, you need to seek assistance from some Thumbnail database viewer programs. These programs will allow you to view thumbnail cache in Thumbs.db files. One of these programs is Thumbs.DB Viewer. Thumbs DB Viewer allows you to open Thumbs.db file and get back the photo or image from the database. Having done that, since Thumbs.db only keep miniature images, the quality of the images recovered from Thumbs.db tends to have lower resolution. You might need to use some photo editor tools to touch up your photo. Thumbs.DB Viewer Version 1.2 is available for free trial.
Download Link.
The software allows displaying Thumbs.db database records as well as the miniature graphics generated. You can view images in full size or as the best fit for program’s window; rotate images right or left by 90 degrees; using a heuristic algorithm, the program can also search swap and hibernation files for a JPG graphic file.
HOW TO CREAT AN INVISIBLE "HIDDEN" DRIVE IN WINDOWS
You’ve probably read a bunch of posts on how to create hidden folders, secure folders, locked folders, etc, etc in Windows on many occasions! Hell, one of the most popular articles on this blog is How to create a secure and locked folder in Windows XP. However, hiding a folder is a tricky proposition and usually doesn’t work well unless you use something like Truecrypt. Ok, so here’s how to implement the hack: first off, BACK UP your registry as this requires adding a key to the registry. Once you’ve backed up your registry, open the registry editor by clicking on Start, Run and typing in regedit. Now navigate to the following registry hive shown below: HKEY_LOCAL_MACHINE\Software\Microsoft\Windows\CurrentVersion\ Right-click on Explorer and choose New and then DWORD Value. Name the new value NoDrives and then double click on it to open the properties dialog box. Click on Decimal for the Base unit. Type in one of the following values depending on that drive letter you want to hide. D: 8 E: 16 I: 256 J: 512 N: 8192 O: 16384 S: 262144 T: 524288 X: 8388608 Y: 16777216 If you want to hide drive E, just type in the value 16. The really cool thing about this trick is the fact that you can hide multiple drives by adding the numbers of the particular drives together. For example, if you want to hide drive E and drive G, you would type in the number 80, which is 64 + 16. When you want to get your drives back, change the value of NoDrives to 0 or simply delete the value altogether. Of course, having to do this everyday can be a pain, so if you’re up for it, you can try and write a registry file that will allow you to insert and delete the value by just double-clicking a file. This trick also works for mapped drives, so if you want to hide mapped drives, you can do it this way (though it might just be easier to disconnect a mapped drive). Enjoy! Source via MindConnection
But there’s yet ANOTHER way you can hide your “private” files using a nifty little registry hack that will completely remove an entire drive from your computer. The drive will not show up in My Computer, will not be accessible from the command prompt, and won’t even show up in Safe Mode!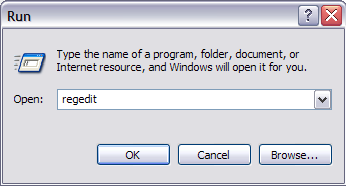
Policies\Explorer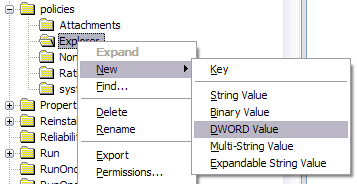
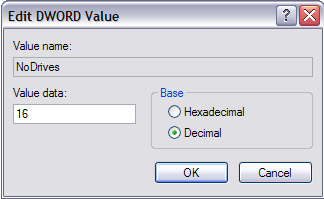
A: 1B: 2C: 4 F: 32G: 64H: 128 K: 1024L: 2048M: 4096 P: 32768Q: 65536R: 131072 U: 1048576V: 2097152W: 4194304 Z: 33554432All: 67108863


